This guide describes how to configure Sitefinity for Single Sign On (SSO) scenarios with Rhythm.
The basic configuration will allow you to authenticate users using Auth0 for SSO. However, Auth0 has no knowledge of the user’s membership or other statuses within Rhythm.
By completing both the basic and role configuration, Sitefinity will automatically assign Sitefinity roles to users for each Rhythm Portal Security Policies for which they qualify.
You can create security policies for active members, committee members, or other ad-hoc eligibility requirements. See the Security Policies guide for more info.
The instructions below apply to Sitefinity 14.3 and earlier (including Sitefinity 13.3 LTS).
If you are using Sitefinity 14.4 LTS or later (including any 15.x release), the configuration steps are different because Progress removed the internal IdentityServer3 and the legacy OpenID/SWT/Forms authentication modes in version 14.4. Skip ahead to Sitefinity 14.4 LTS and Later Configuration for the updated steps.
To enable SSO, you will need to know your Auth0 Domain and Client ID. You can get these values by submitting ticket in ZenDesk. Please indicate that you need this information to configure SSO in Sitefinity so the Rhythm team can enable the Sitefinity integration for your client.
This configuration requires a version of Sitefinity that is covered under Long Term Support (LTS). Please see the SiteFinity's Lifecycle Policy page to confirm that your version is not Retired.
The configuration in this section will enable users to authenticate with Sitefinity using their Rhythm credentials stored in Auth0.
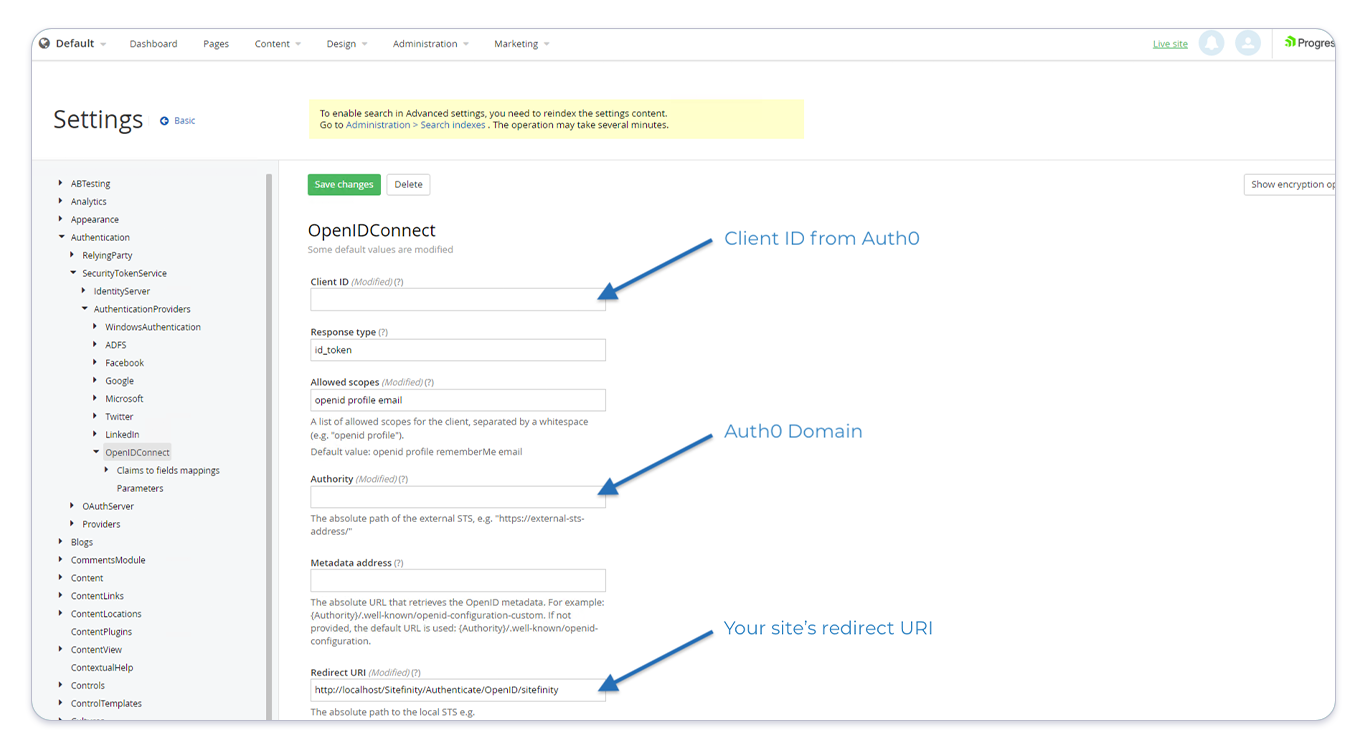
Start by navigating to the settings of your Sitefinity site and toggle to Advanced settings. Next, in the left menu navigate to Authentication > SecurityTokenService > AuthenticationProviders > OpenIDConnect and set the following values:
Client ID: This should be the Auth0 Client ID supplied by Rhythm supportAuthority: This should be the Auth0 Domain supplied by Rhythm supportRedirect URI: This should be the URL of your site in the format: "http://[your-site-url]/Sitefinity/Authenticate/OpenID/sitefinity"
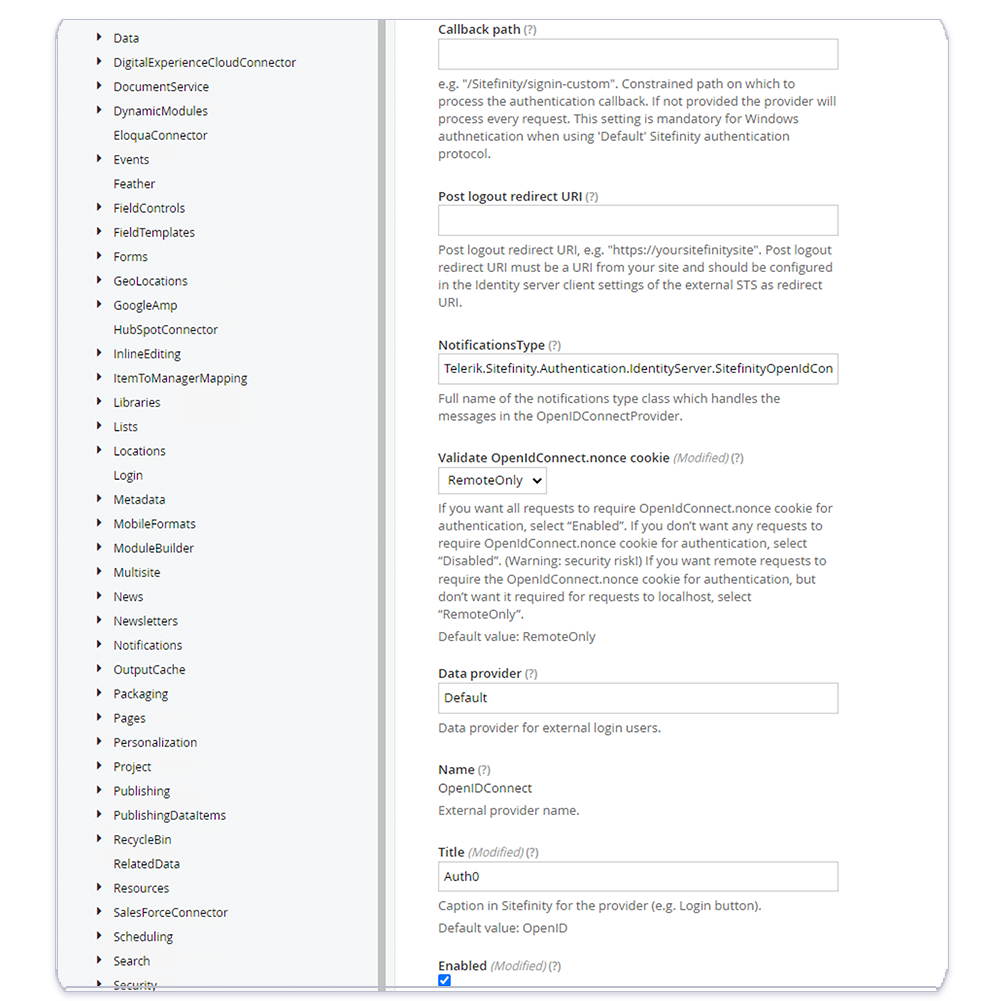
After this configuration, the OpenIDConnect settings should look like the following:
At this point, resetting your site using iisreset should enable SSO. We recommend testing this now, even if you decide to continue to enable role assignment.
This configuration is optionally used when you want to automatically assign roles to users based on security policies in Rhythm.
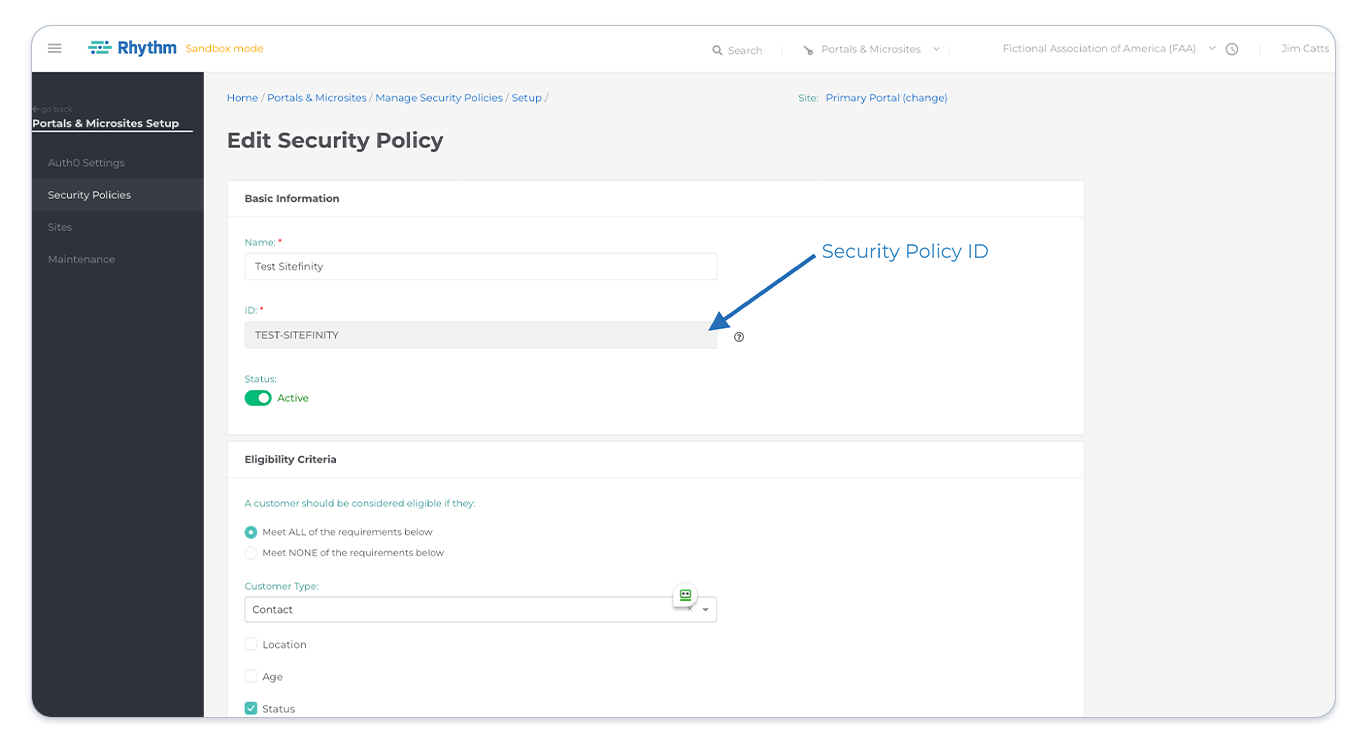
Start by configuring the security policies in Rhythm that you want to use to assign users to roles in Sitefinity. You have a wide range of options on how to segment your users and can create as many security policies as you would like. As you create each security policy it will be assigned an ID. Make note of these IDs as we will need them later. You can see an example ID in this screenshot:
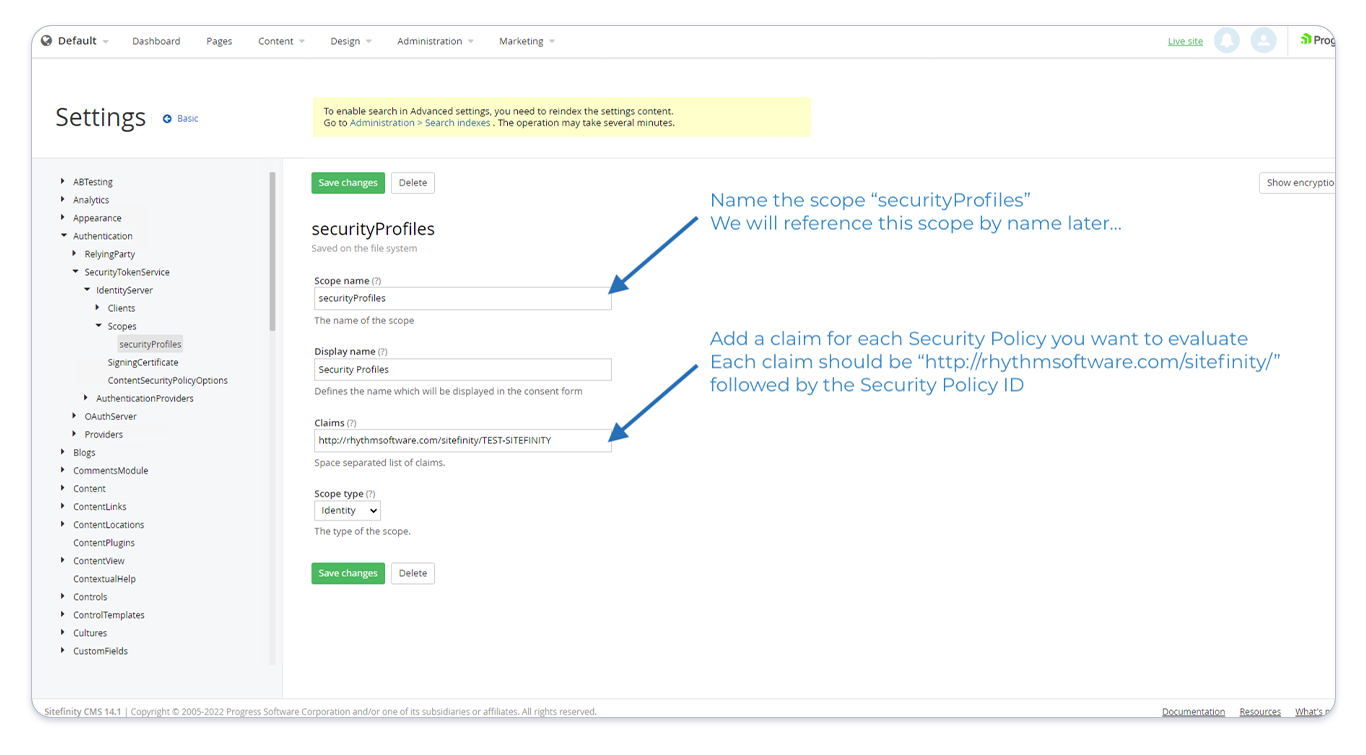
Return to the settings of your Sitefinity site and toggle to Advanced settings. Next, in the left menu navigate to Authentication > SecurityTokenService > IdentityServer > Scopes and create a new scope with the following values:
Scope Name: "securityProfiles"Claims: This should be a comma separated list with eachsecurity policyyou want to assign to a Sitefinity role. Using thesecurity policyIDs you noted above, the claim for eachsecurity policyshould be formatted like: "http://rhythmsoftware.com/sitefinity/[security-policy-id]"
Once complete, your new scope should look like:
You will now need to add this scope to the configuration in several locations.
Next, in the left menu navigate to Authentication > SecurityTokenService > IdentityService > Clients > sitefinity. Add the new "securityPofiles" scope you just created to the Allowed Scopes as in the screenshot below:

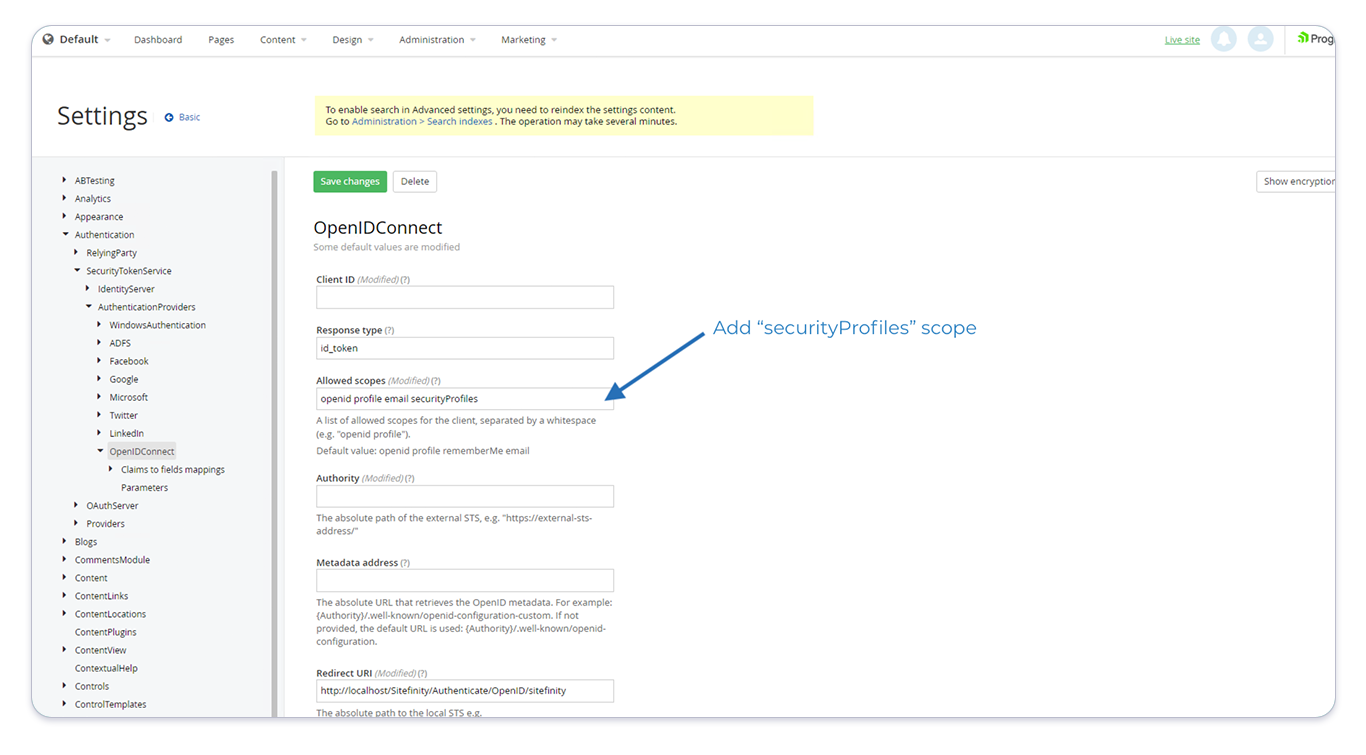
Next, in the left menu navigate back to Authentication > SecurityTokenService > AuthenticationProviders > OpenIDConnect and add the new "securityProfiles" scope to the Allowed Scopes as on the screenshot below:
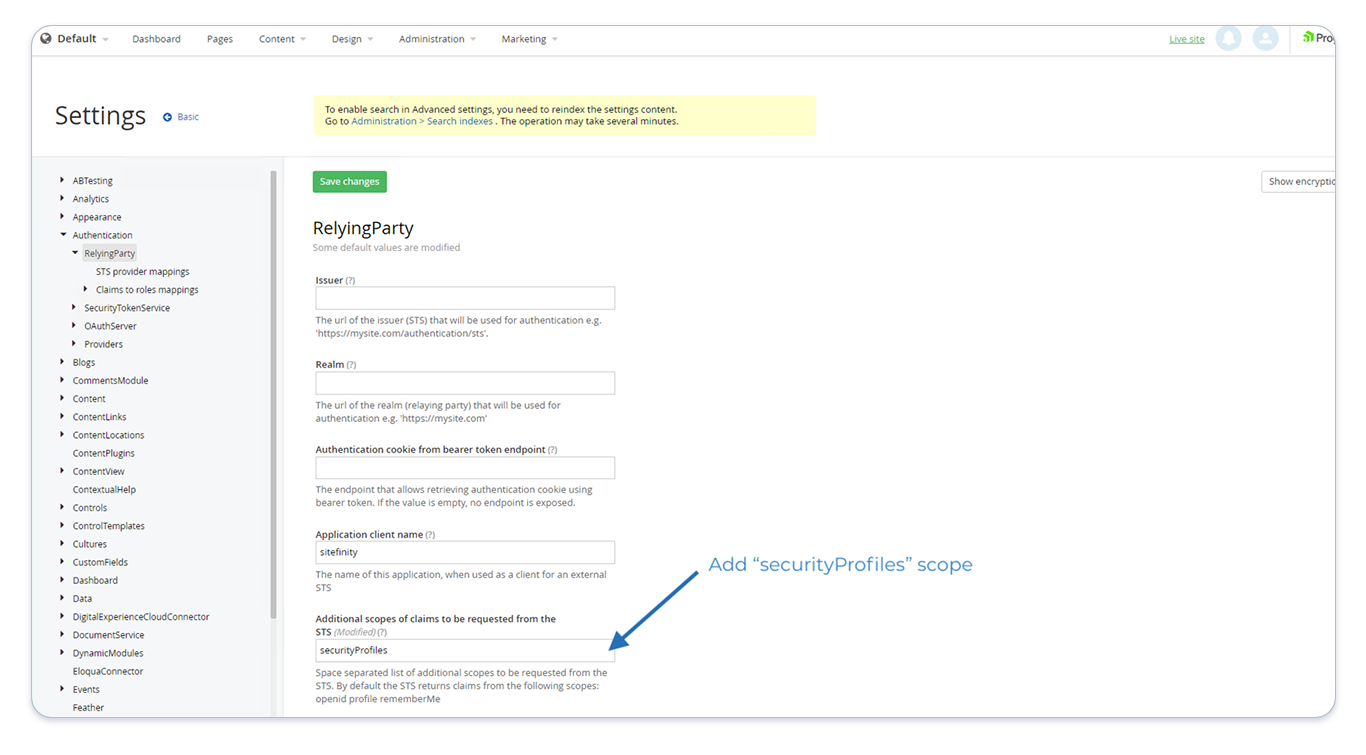
Next, navigate to Authentication > RelyingParty and add the new "securityProfiles" scope to the Additional scopes of claims to be requested from STS as in the screenshot below:
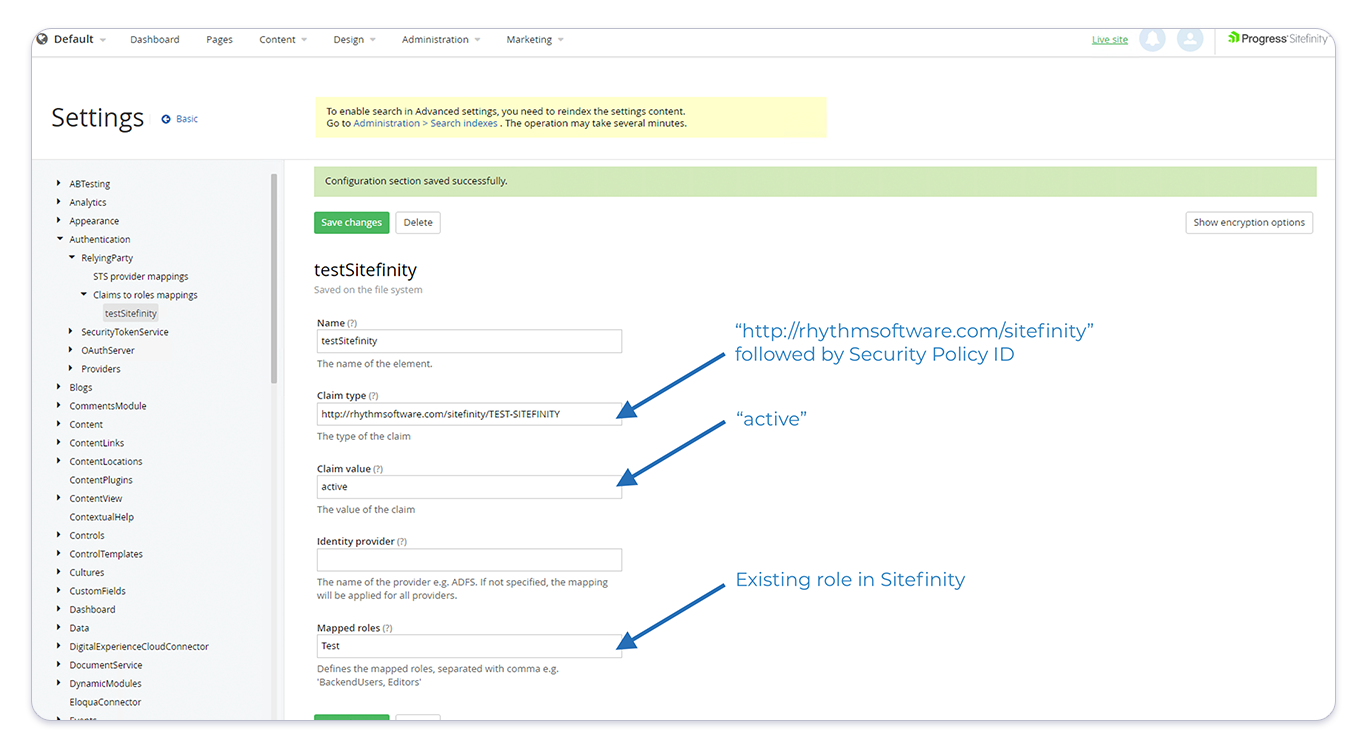
Finally, we are going to map the claim for each security profile to a Sitefinity role. Start by navigating to Authentication > RelyingParty > Claims to role mappings. For each security policy you want to map to a Sitefinity role, add a new mapping with the following values:
Name: The name of the Security PolicyClaim type: One of thesecurity policyclaim values you specified above in the format: "http://rhythmsoftware.com/sitefinity/[security-policy-id]"Claim value: "active"Mapped roles: One or more existing Sitefinity roles that users should be assigned if thesecurity policyapplies to them
Each mapping should look like the following screenshot:
Once all of your configuration is complete, you need to perform an iisreset to enable the new configuration. At this point, users should be assigned Sitefinity roles each time they log in.
Please be aware, Sitefinity does not show roles assigned by claims in the User Administration area. If you look at a user who has logged in, all roles will always be unchecked. However, the roles will be assigned dynamically each time the user logs in. For more information see this help article
The instructions in this section apply to Sitefinity 14.4 LTS and later, including all Sitefinity 15.x releases. Use this section if your Sitefinity version is 14.4 or newer.
In Sitefinity 14.4 (March 2023), Progress removed the legacy OpenID, SWT, and Forms authentication modes along with the internal IdentityServer3 package. The "Default" authentication protocol (introduced in 14.0 and made the default in 14.1) is now the only option.
As a result, Sitefinity no longer acts as its own STS. The securityProfiles scope is now defined in Auth0 (managed by Rhythm) rather than inside Sitefinity, and Sitefinity acts purely as a relying party that delegates authentication to Auth0.
To enable SSO, you will need to know your Auth0 Domain and Client ID. You can get these values by submitting a ticket in ZenDesk. Please indicate that you need this information to configure SSO in Sitefinity so the Rhythm team can enable the Sitefinity integration for your client.
This configuration requires a version of Sitefinity that is covered under Long Term Support (LTS). Please see the Sitefinity Lifecycle Policy page to confirm that your version is not Retired. As of this writing, supported LTS versions include Sitefinity 14.4 LTS and Sitefinity 15.4 LTS.
If you are upgrading from an older version of Sitefinity, confirm that the Default authentication protocol is selected before continuing. Navigate to Administration » Settings » Advanced » Authentication and ensure the Authentication dropdown is set to Default. This is the only supported option in 14.4 and later.
The configuration in this section will enable users to authenticate with Sitefinity using their Rhythm credentials stored in Auth0.
Start by navigating to the settings of your Sitefinity site and toggle to Advanced settings. Next, in the left menu navigate to Authentication > SecurityTokenService > AuthenticationProviders > OpenIDConnect and set the following values:
Client ID: The Auth0 Client ID supplied by Rhythm supportClient Secret: The Auth0 Client Secret supplied by Rhythm support (required for authorization code flow)Response type:code(recommended — authorization code flow)Authority: The Auth0 Domain supplied by Rhythm supportMetadata address: Leave blank to use the default ({Authority}/.well-known/openid-configuration)Allowed scopes:openid emailat minimum (thesecurityProfilesscope is added in the Role Assignment section below)Redirect URI: The URL of your site, for examplehttps://[your-site-url]/Use PKCE: Enabled (recommended when usingcoderesponse type)
Progress now recommends authorization code flow with PKCE as the most secure option. The legacy implicit flow (response type = id_token) is still available but is no longer recommended for new configurations.
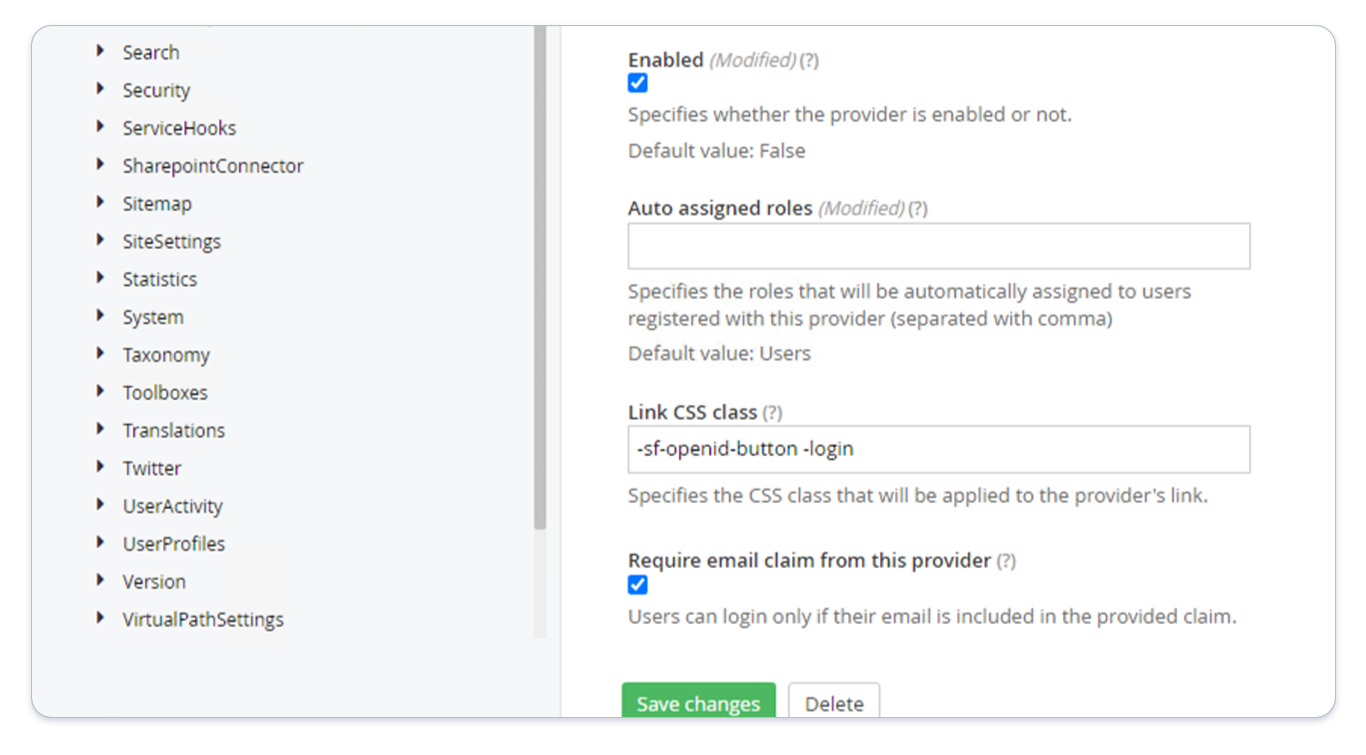
Select the Enabled checkbox and save your changes.
At this point, resetting your site using iisreset should enable SSO. We recommend testing this now, even if you decide to continue to enable role assignment.
This configuration is optionally used when you want to automatically assign Sitefinity roles to users based on security policies in Rhythm.
In Sitefinity 14.4 and later, the securityProfiles scope is defined in Auth0 and is fulfilled by a Rhythm-managed Auth0 post-login action. When Sitefinity requests the securityProfiles scope at login, the action calls Rhythm to look up which security policies the user qualifies for and adds a claim of the form http://rhythmsoftware.com/sitefinity/[security-policy-id] with value active to the ID token for each one.
The Auth0 action is configured by Rhythm support as part of your tenant setup — you do not need to configure anything in Auth0 directly. Your only responsibility is to (1) tell Sitefinity to request the securityProfiles scope and (2) map the resulting claims to Sitefinity roles.
Start by configuring the security policies in Rhythm that you want to use to assign users to roles in Sitefinity. You have a wide range of options on how to segment your users and can create as many security policies as you would like. As you create each security policy it will be assigned an ID. Make note of these IDs as we will need them later.
Return to Authentication > SecurityTokenService > AuthenticationProviders > OpenIDConnect and add securityProfiles to the Allowed scopes field (alongside openid email). Save your changes.
This causes Sitefinity to include securityProfiles in the scopes it requests from Auth0 at login, which triggers the Rhythm post-login action to enrich the token with the user's security policy claims.
Finally, map the claim for each security policy to a Sitefinity role. Navigate to Authentication > RelyingParty > Claims to role mappings. For each security policy you want to map to a Sitefinity role, click Create new and add a new mapping with the following values:
Name: The name of the Security PolicyClaim type: The claim value in the formathttp://rhythmsoftware.com/sitefinity/[security-policy-id]Claim value:activeMapped roles: One or more existing Sitefinity roles that users should be assigned if thesecurity policyapplies to them
Save your changes.
Once all of your configuration is complete, perform an iisreset to enable the new configuration. At this point, users should be assigned Sitefinity roles each time they log in.
Please be aware, Sitefinity does not show roles assigned by claims in the User Administration area. If you look at a user who has logged in, all roles will always be unchecked. However, the roles will be assigned dynamically each time the user logs in. For more information see this help article.